What’s Inside
- 1. Master Your Camera Gear for Detail
- 2. Embrace Soft Diffused Lighting for Skincare Products Photography
- 3. Use Reflective Surfaces for Luxury Vibes
- 4. Integrate Natural Elements as Props
- 5. Showcase Product Textures with Macro Shots
- 6. Employ the Rule of Thirds for Dynamic Composition
- 7. Utilize Negative Space Strategically
- 8. Clean and Prepare Products Meticulously
- 9. Experiment with Water Elements for Hydration
- 10. Set Your Camera to Manual Mode
- 11. Align Props and Backgrounds with Brand Identity
- 12. Embrace Sensory Skincare Visuals
- 13. Utilize Rim Lighting for Definition and Glow
- 14. Try Low Angles for Skincare Products Photography
I sat on the cold hardwood floor last Tuesday, surrounded by half-empty bottles from Whole Foods, crying over a single shot. My attempt at skincare product photography was a total disaster. I spent three hours trying to capture the milky texture of a $24.99 Acure serum. The glass bottle just reflected my messy living room and my stressed-out face. The lighting was awful. The texture looked like curdled milk. I realized then that snapping a quick pic with my iPhone wasn’t going to cut it anymore. Skincare product photography needs actual strategy. You can’t just slap a filter on a jar of cream and expect magic. I’ve spent two years figuring out how to make a cheap drugstore moisturizer look like a hundred-dollar luxury treatment. I learned the hard way that direct sunlight turns expensive serums into harsh, glaring messes. I’ve wasted money on the wrong props and spent hours editing out dust I should’ve just wiped off. Let’s walk through the steps to get those juicy, glossy, scroll-stopping shots without losing your mind. Trust me.
1. Master Your Camera Gear for Detail
You need a real camera if you want those crazy detailed texture shots. I used my phone for months before figuring it out. It just doesn’t capture the tiny, gritty granules of a physical exfoliant or the exact viscosity of a gel moisturizer. I swear by upgrading to a DSLR or mirrorless camera with manual settings. You need a dedicated macro lens. A good 100mm macro lens costs anywhere from $300 to over $1000, but it’s worth every penny. I bought a used one online for $450 and it changed my work. When I shoot a $38 Laneige Water Sleeping Mask, you can see the bouncy gel texture pulling away from the spatula. If you’re shooting the product swatched on a model’s face or hand, you’ll want a 50mm or 85mm lens instead. The macro is too tight for full faces. Most people get this wrong. They try to shoot a tiny 1 oz bottle from three feet away with a standard kit lens. The results are always blurry and flat. Invest in the glass if you want professional results.

2. Embrace Soft Diffused Lighting for Skincare Products Photography
Soft, diffused light is non-negotiable for skincare. I used to drag my products outside at noon, thinking bright sunlight was the best option. Honest mistake. Direct, harsh lighting obscures product details and creates ugly, blown-out white spots. It makes a $60 Drunk Elephant cream look like cheap plastic. You want a soft, even glow that makes the formulas look hydrating. I set up my shooting table right next to a north-facing window. Natural daylight gives you that clean aesthetic that brands love. For gloomy days or late-night studio setups, I use softboxes. I picked up a Godox FV150 continuous light for about $250 online. I pair it with a massive 32-inch softbox. The thick white diffusion fabric softens the light beautifully. You get gentle, sweeping highlights across curved glass bottles instead of sharp, distracting reflections. Skip the cheap ring lights. They leave weird circular reflections in every glossy cap.

3. Use Reflective Surfaces for Luxury Vibes
If you want your photos to scream luxury, you need reflective surfaces. I’m obsessed with using mirror acrylic boards and glossy black tiles. I found a pack of 12-inch black acrylic sheets at Target for $14.99. They’re incredible for creating moody setups. You place a heavy glass serum bottle on that glossy black surface and it instantly creates a perfect, deep reflection. It adds so much depth to the composition. I tried using regular bathroom mirrors at first, but that was a mistake. Standard mirrors have a gap between the glass and the reflective backing. This creates a weird, double-layered ghost reflection. It looks terrible. You need front-surface mirrors or solid acrylic. I also love using reflective glass or a polished metal tray from Costco that cost me $19.99. When you shoot a bright, colorful product like a $39 Glow Recipe Watermelon toner against a dark, reflective surface, the contrast is stunning. Just keep a microfiber cloth handy. These surfaces attract dust like crazy.

medicube Deep Vitamin C Capsule Serum | Hydrating Vitamin C
medicube Deep Vitamin C Capsule Serum | Hydrating Vitamin C Serum for has been one of the most consistently praised picks in this category. 230 reviewers averaged 4.5/5.

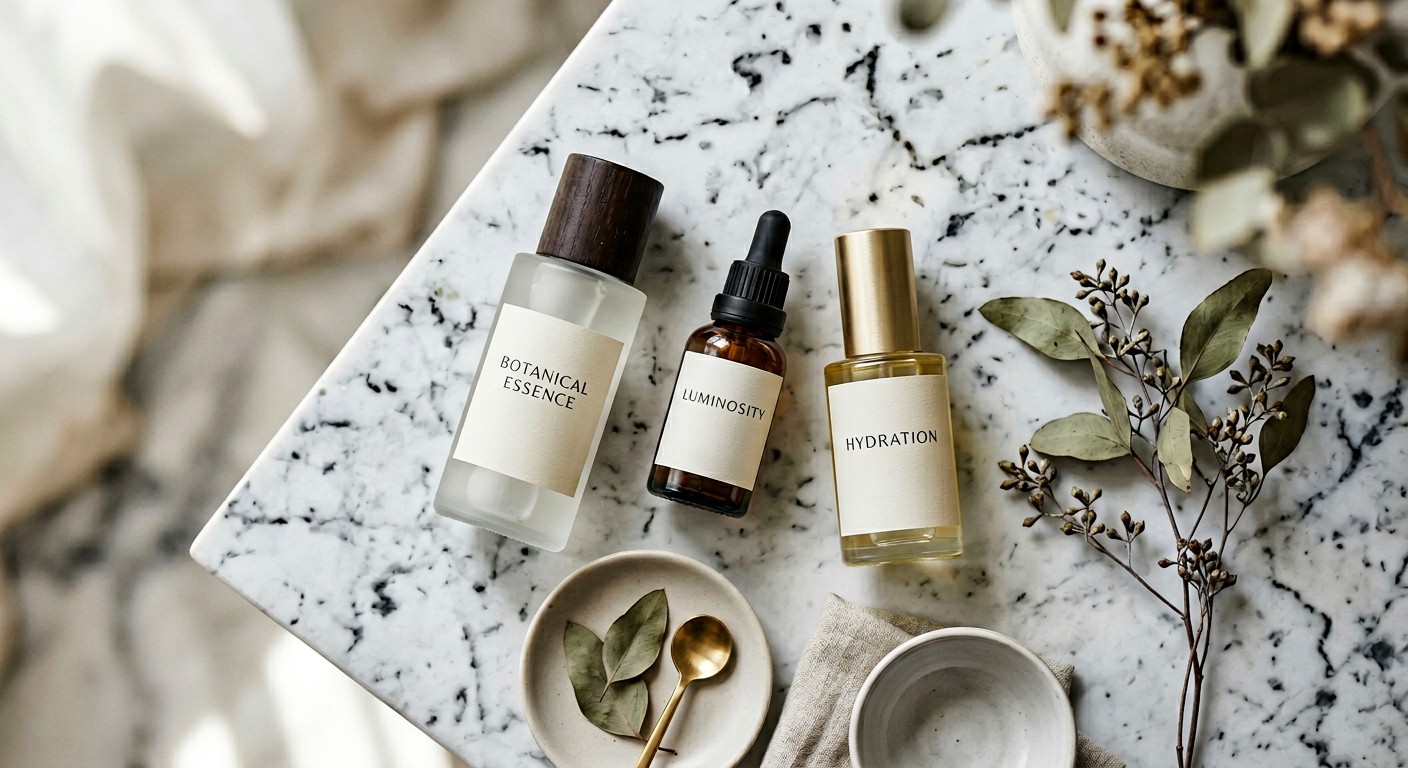
4. Integrate Natural Elements as Props
Props tell the story of what’s inside the bottle. If a brand emphasizes clean, botanical ingredients, you need to show that visually. I do a massive grocery run before every big shoot. Last week, I went to Sprouts and loaded my cart with fresh mint, pineapples, oranges, and aloe vera leaves. The total was maybe $12.50. Those fresh ingredients make the photos come alive. If I’m shooting a vitamin C serum, I slice up a fresh orange and arrange the segments around the 1 oz dropper bottle. The bright citrus smell fills my whole apartment. No exaggeration. Expert opinion says your props should complement the product without overshadowing it. I definitely messed this up early on. I once buried a tiny $15 tube of eye cream under a massive pile of lavender sprigs. You couldn’t even read the label. Keep it simple. Two or three fresh leaves or a single sliced fruit is plenty. You want the viewer to almost smell the herbal notes just by looking at the picture. You might also like: 20 Gorgeous Aesthetic Products Korean Skincare for Every Budget

5. Showcase Product Textures with Macro Shots
Consumers want to know what a product feels like before they spend their money. This is where your macro lens shines. You need to capture close-up details of the textures. I’m talking about the thick, whipped consistency of a body butter or the rough, sugary granules of a lip scrub. Hyper-realistic macro photography is a massive trend. People want to see the sticky, stringy pull of a snail mucin essence. I like to do application shots. I’ll take a 1/2 teaspoon of a thick ceramide cream and smear it across a clear piece of glass. Then I shoot it heavily backlit so you can see the exact density of the formula. Another great trick is showing a hand with a watery lotion dripping down the skin. I recently shot a $22 COSRX essence this way. The macro details of the liquid clinging to the skin looked so refreshing. Don’t just shoot the closed jar. Open it up, dig a metal spatula in there, and show off that gooey goodness. You might also like: 15 Gorgeous Aesthetic Glass Skin That Changed Everything

6. Employ the Rule of Thirds for Dynamic Composition
I used to put every product dead center in the frame. It felt safe. Honestly, it looked boring and static. Your photos will look more professional if you use the Rule of Thirds. Imagine a 3×3 grid over your camera screen. Instead of centering your 2 oz moisturizer jar, position it along those imaginary lines or at the intersections. It creates a balanced and visually engaging composition. I was shooting a $48 Tatcha Dewy Skin Cream last month. Placing the purple jar slightly to the lower right intersection changed everything. It allowed the soft, blurred background elements to breathe. Almost every modern camera has a setting to turn this grid on. Use it. A common mistake is ignoring the grid and cropping the photo later. You lose so much resolution that way. Frame it right in the camera. When the product is off-center, your eye naturally wanders through the whole image, taking in the props, lighting, and texture. You might also like: 20 Stunning Tips Natural Skincare That Actually Work
Clear Stackable Makeup Organizer with Drawer
Clear Stackable Makeup Organizer with Drawer punches above its price — 300 buyers rated it 4.5 stars. I would buy it again.

7. Utilize Negative Space Strategically
Negative space is your best friend. Leaving empty space around your product draws all the attention right to the label. It creates a sense of calm and high-end minimalism. When I flip through expensive beauty magazines, the luxury ads always have tons of empty space. I tried cramming five different products and ten props into a single frame once. It looked like a messy garage sale. Now, I give the product room to breathe. If I’m shooting a tall, skinny 4 oz toner bottle, I’ll place it on the far right side of the frame and leave the entire left side completely empty. I feature a soft, textured background. This empty space is valuable for brands. They need that room for text overlays, logos, or sale announcements in their graphics. I use a massive roll of seamless white paper I bought at a local camera shop for $35. It gives me endless, clean negative space. Don’t be afraid of the emptiness. It makes the product look more important.

8. Clean and Prepare Products Meticulously
This step is tedious, but you can’t skip it. Before you touch your camera, you have to clean and polish every single piece of packaging. High-resolution cameras capture everything. I’m talking about tiny fingerprints, microscopic dust particles, and smudges you didn’t even know were there. I learned this the hard way after shooting a $42 Sunday Riley Good Genes bottle. I spent three hours in Photoshop cloning out lint and fingerprints because I was too lazy to wipe the glass beforehand. Now, I keep a stack of microfiber cloths and a $3.99 bottle of rubbing alcohol from Kroger in my studio. I wipe down the jars, the dropper caps, and the glass bottles until they’re pristine. I even wear cheap white cotton gloves when I place the products on the set. A common mistake is thinking you can just fix a dirty bottle in post-production. It takes ten seconds to wipe a smudge off a jar. It takes ten minutes to edit it out perfectly. Save yourself the headache and prep meticulously.

9. Experiment with Water Elements for Hydration
If you’re photographing a hyaluronic acid serum or a lightweight gel moisturizer, you have to emphasize hydration. Water elements are perfect for this. I love incorporating actual water droplets on the product packaging. I use a cheap $1.50 spray bottle from Walmart mixed with half water and half vegetable glycerin. The glycerin makes the droplets thick and sticky so they don’t just roll off the glass. They stay perfectly round and catch the light beautifully. Here’s a surprising trick I use all the time. Pour about 1/4 cup of water directly onto a glass table or a clear acrylic sheet. You can create subtle ripple effects by gently tapping the water with a spoon right before you click the shutter. It creates amazing, dynamic reflections that make the product look like it’s floating in a crystal-clear pool. I shot a $19 Neutrogena Hydro Boost water gel this way. The blue jar reflecting in the rippled water looked refreshing. It communicates exactly what the product does without using any words.
Rotating Makeup Organizer
Honestly, Rotating Makeup Organizer surprised me — sturdier than it looks in the photos, and over 47 buyers gave it 4.5 stars.
10. Set Your Camera to Manual Mode
You can’t rely on auto mode for this kind of work. Your camera doesn’t know you’re trying to capture the subtle glow of a pearlized serum. You have to take control and shoot in manual mode. I always aim for a low ISO, usually around 100 or 200. This minimizes that ugly, grainy noise in the shadows. For the aperture, I keep it between f/7.1 and f/16. You want a deep depth of field so the entire product label is sharp and readable. If you shoot wide open at f/2.8, the front of the jar will be in focus, but the brand name will be a blurry mess. Because I use a narrow aperture and a low ISO, I need a slow shutter speed to let enough light in. I often shoot at 1/13 of a second. You need a heavy, sturdy tripod for this. I bought a solid metal tripod for $120. It holds my camera perfectly still. If you try to hand-hold a camera at 1/13 of a second, your photos won’t be usable.
11. Align Props and Backgrounds with Brand Identity
You have to match the vibe of the brand. You can’t shoot a clinical, dermatologist-tested acne serum on a pile of romantic pink rose petals. It just looks confusing. For a clinical brand, I use glass beakers, stainless steel medical trays, and crisp white backgrounds. It feels sterile and scientific. I recently shot a classic $8.90 bottle of The Ordinary Niacinamide. Their whole aesthetic is raw and minimalist. I used a plain, light grey concrete backdrop. No distracting props. Just clean, neutral tones. If I’m shooting an eco-conscious, vegan brand, I opt for natural textures. I went to a local hardware store and bought a heavy slab of raw travertine stone for $18. It has all these beautiful, earthy pits and grooves. I also love using pieces of reclaimed wood. The rough, organic textures contrast beautifully with smooth glass bottles and glossy plastic caps. Think about who is buying the product. Your background materials should instantly communicate the brand’s core values before the customer even reads the label.
12. Embrace Sensory Skincare Visuals
The beauty industry is moving toward sensory experiences. The big trend is sensory skincare and crazy 3D face creams. People want products that look fun to touch and use. You need photography that emphasizes these unique physical forms. Brands like Sundae Body are doing this perfectly. I bought their whipped shower foam for $16 just to practice shooting it. It dispenses exactly like canned whipped cream and smells like a birthday cake. I sprayed a huge, perfect swirl of it onto a pastel pink acrylic board and shot it with bright, punchy lighting. You want to capture the air bubbles, the fluffiness, and the exact way it holds its shape. I also love doing messy texture smears. I’ll take 2 tablespoons of a thick, colorful clay mask and create thick, artistic swooshes on a piece of white cardstock. You use a small palette knife to create deep ridges and peaks in the cream. It makes the viewer want to reach through the screen and touch it.

6Pcs Jade Roller for Face
6Pcs Jade Roller for Face punches above its price — 27 buyers rated it 4.5 stars. I would buy it again.
13. Utilize Rim Lighting for Definition and Glow
Rim lighting is my secret weapon for making cheap packaging look expensive. It’s a technique where you place a light source directly behind the product, pointing back toward the camera. It creates a stunning, subtle outline of light around the edges of the bottle. It separates the product from the background and adds a beautiful three-dimensional quality. This works exceptionally well for clear, glossy, or reflective packaging. When you rim-light a frosted glass serum bottle, the liquid inside actually glows. It looks premium and heroic. You don’t even need expensive gear for this. I’ve used a cheap $12 set of LED string lights from Costco taped behind a piece of diffusion paper to create a glowing edge. Just make sure the light source itself is hidden behind the product or off-camera. You don’t want it to flare into your lens. I see so many beginners light their products purely from the front. The results are flat and lifeless. Add that backlight and watch the edges pop out of the background.

14. Try Low Angles for Skincare Products Photography
Here’s a surprising tip that most people never think about. Change your physical angle. We naturally want to shoot products from a standard 45-degree angle, looking down at them. But if you drop your camera low and shoot slightly upward, it changes the vibe. Shooting from a low angle makes the product look prestigious and impactful. This technique is incredible for luxury skincare items because it gives them an aspirational, heroic feel. I tried this with a basic, chunky $15 CeraVe moisturizing tub. I placed it on a white pedestal, dropped my camera down to table level, and tilted the lens up. Suddenly, that basic drugstore tub looked like a monument. It commanded attention. You do have to be careful with distortion. If you get too close with a wide lens from a low angle, the bottom of the bottle will look huge and the top will look tiny. Use a longer focal length, like an 85mm, step back, and shoot low. It creates a powerful, commanding image.
I’ve ruined so many photos by over-editing them. It’s a trap we all fall into. You crank up the contrast and smooth out the skin until everything looks fake. Don’t do it. Careful preparation is the basis for avoiding too much retouching. I learned that the hard way. If you follow these steps, your raw images will look incredible before you even open them on your computer. I personally swear by getting the lighting and the props perfect in real life. It saves me hours of frustrating computer work later. Grab your camera, wipe down your bottles, and start playing with shadows and reflections. You’ll be amazed at what you can create in your own living room. If this guide helped you figure out your lighting setup, save it to your Pinterest beauty boards so you can reference it during your next big photoshoot!

Frequently Asked Questions
What lens is best for skincare products photography?
A 100mm macro lens is ideal for capturing the intricate textures and fine details of skincare products, like the granules in a scrub. For swatches on models, a 50mm or 85mm lens works best to avoid facial distortion.
How do you light skincare products effectively?
Always use soft, diffused lighting. Direct sunlight causes harsh glare on glossy packaging. Use large softboxes or shoot next to a north-facing window to create a gentle, even glow that makes formulas look hydrating and luxurious.
Why do my product photos look flat?
Flat photos usually result from lighting purely from the front. Try adding rim lighting by placing a light source behind the product. This creates a glowing outline that separates the bottle from the background and adds 3D depth.
How can I make drugstore skincare look expensive on camera?
Shoot from a low angle to make the product look prestigious and commanding. Use reflective surfaces like black acrylic, leave plenty of negative space around the item, and ensure the packaging is polished completely free of fingerprints.