What’s Inside
- The Essential Hydrating Rosehip Oil Homemade Skincare Recipe
- Why You Need to Measure by Weight, Not Volume
- The Turmeric and Yogurt Brightening Paste
- Ditch the Kitchen Lemon Juice Immediately
- Master pH Testing for Every Homemade Skincare Recipe
- Preservatives Are Mandatory for Water-Based Mixes
- The Acne-Fighting Tea Tree and Aloe Vera Mask
- Dilute Essential Oils Safely (The 1% Rule)
- Gentle Exfoliation with a Soothing Oatmeal Mask
- Stop Putting Baking Soda on Your Face
- Embrace Skin Slugging for Intense Overnight Hydration
- Source Real Cosmetic-Grade Ingredients
- A Simple Honey and Green Tea Toner
- The Proper Storage Rules for Your DIYs
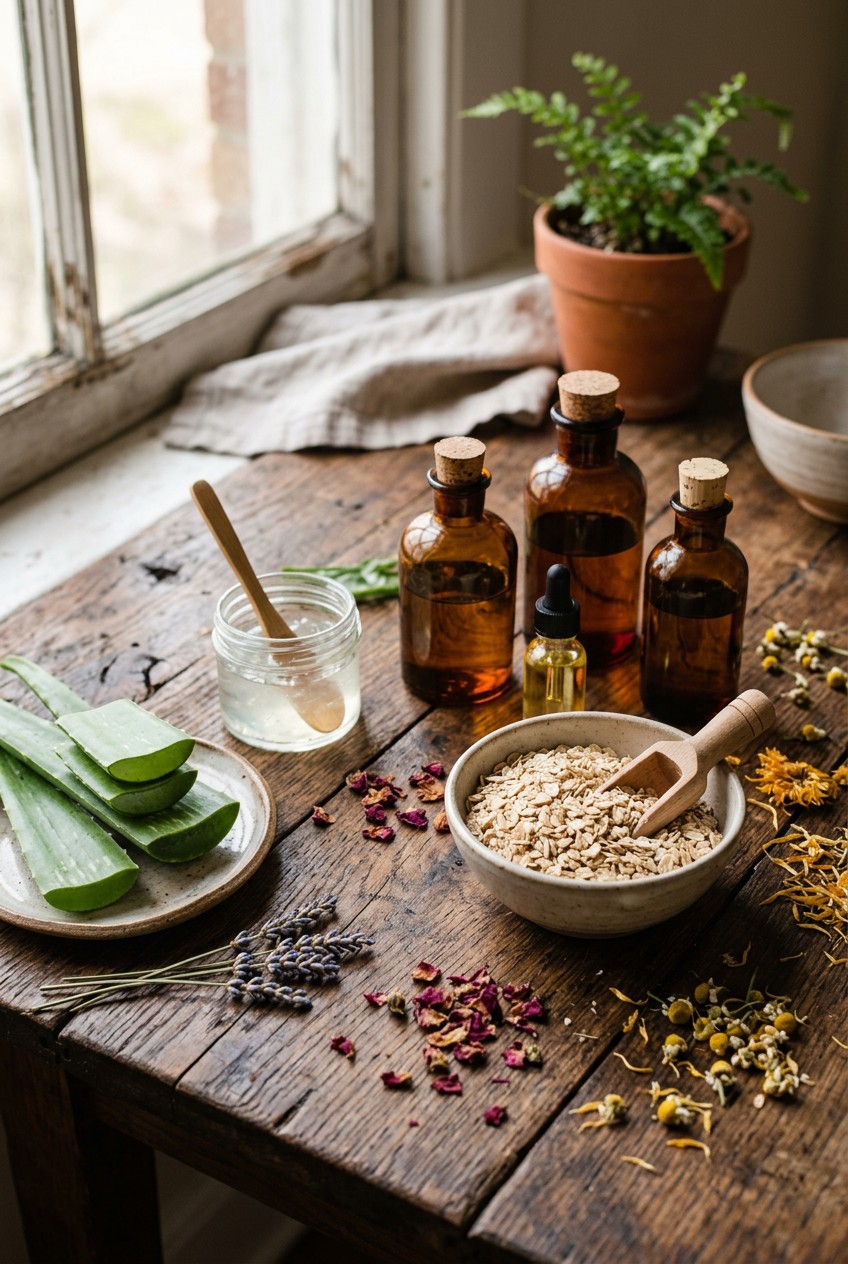
Last Tuesday at Whole Foods, I caught myself staring at a pile of organic lemons, having a full-blown flashback to my worst DIY disaster. I used to think rubbing straight citrus on my cheeks was the ultimate homemade skincare recipe for glowing skin. Spoiler alert. It’s not. I gave myself a chemical burn that took three weeks to heal. My skin felt like tight, hot sandpaper. If you’re tired of Pinterest fails and want a homemade skincare recipe that actually works, I’ve got you covered. No fluff. Just real science, exact measurements, and the hard lessons I’ve learned the ugly way. Let’s fix your routine.
1. The Essential Hydrating Rosehip Oil Homemade Skincare Recipe

I’ve wasted so much money on high-end serums that smell like synthetic perfume and do absolutely nothing. If you’ve got dry or mature skin, you’re going to want to mix this up immediately. You need 1.5 tablespoons of Life-flo Organic Pure Rosehip Seed Oil. You can usually find it at Sprouts for exactly $12.99 for a 1 fl oz bottle. Combine that with 0.5 tablespoons of pure argan oil. The texture is incredibly silky. Rosehip oil has this very distinct, earthy, slightly nutty smell. It doesn’t smell like fresh roses. I tried this wrong for months before figuring it out. I used to apply it to bone-dry skin, and it just sat there looking like an oil slick. You’ve got to press it into damp skin. I usually mist my face with plain water first. The rosehip oil is packed with essential fatty acids that visibly plump up those fine lines around your mouth. Plus, the amber glass bottle it comes in keeps the light from degrading the oil. Keep it in your fridge so it won’t go rancid. I’ve noticed my acne scars fading a bit faster since I incorporated this exact blend. It’s truly a staple on my bathroom counter now.
2. Why You Need to Measure by Weight, Not Volume

Most people get this wrong right out of the gate. I know I did. For years, I used basic kitchen measuring spoons for my DIY projects. I’d scoop up a teaspoon of this and a tablespoon of that. Then I wondered why my lotions would separate into a gross, watery mess. If you’re serious about making safe products, you’ve got to measure by weight in grams using a digital scale. Relying on eyeballing measurements is a massive mistake. A tablespoon of a dense butter weighs completely differently than a tablespoon of a lightweight oil. I bought a basic Taylor digital kitchen scale at Target for $19.99, and it completely fixed my formulation issues. You just place your glass beaker on the scale, hit the tare button to zero it out, and pour your ingredients until you hit the exact gram count. Plus, when you start working with active ingredients or preservatives, being off by a fraction of a gram can actually ruin your skin. Don’t skip the scale. It’s the only way to guarantee your product won’t separate or cause a bizarre chemical reaction on your face. I’ve thrown away at least four batches of expensive ingredients just because my volume measurements were slightly off. Save yourself the headache and the cash.
3. The Turmeric and Yogurt Brightening Paste

I absolutely love the results of this mask, but I’ve got to warn you about the mess. Last month, I dripped a tiny bit of this mixture onto my white bath mat, and the stain is still there. Turmeric is incredibly potent. To make this brightening paste, you’ll mix 1 teaspoon of high-quality organic turmeric powder with 2 tablespoons of plain, unsweetened Greek yogurt. I buy the 365 brand organic turmeric powder at Whole Foods for $4.99. The yogurt acts as a creamy, cooling base that stops the turmeric from turning your face completely yellow. The paste smells a bit like an Indian restaurant, which I personally don’t mind. You apply a thick layer to your face and let it sit for exactly 10 minutes. Don’t leave it on longer. I once left it on for 25 minutes while watching Netflix, and I looked like a glowing yellow highlighter for two days. When you rinse it off, you’ll immediately notice your skin looks less red and angry. Turmeric is fantastic for calming down active breakouts. Just make sure you use a dark-colored washcloth to remove it. I’ve ruined three white towels before I finally learned my lesson. Seriously, buy a cheap black washcloth just for this specific mask.

Yeamon Gua Sha Facial Tools and Face Roller Set
Yeamon Gua Sha Facial Tools and Face Roller Set punches above its price — 1 buyers rated it 4.5 stars. I would buy it again.
4. Ditch the Kitchen Lemon Juice Immediately

I can’t stress this enough. Stop putting straight lemon juice on your face. I see this advice all over the internet, and it makes my skin crawl. When I was in college, I bought a bag of lemons at Kroger for $3.99, squeezed them into a bowl, and applied the raw juice directly to my acne scars with a cotton pad. The burning sensation was immediate and intense. I thought the pain meant it was working. I was so wrong. Lemon juice has a pH of around 2. Your skin naturally sits at a slightly acidic pH of about 5.5. When you apply something that acidic, you’re literally giving yourself a chemical burn and destroying your skin’s protective barrier. My face was red, peeling, and incredibly sensitive to the sun for weeks. Lemon juice also causes phytophotodermatitis, which means if you walk outside into the sun with lemon juice residue on your skin, you can get severe blistering and permanent dark spots. If you want to brighten your skin, use a properly formulated Vitamin C serum or the turmeric mask I mentioned earlier. Leave the lemons in your kitchen where they belong. I’m still dealing with slight hyperpigmentation on my left cheek from that stupid college experiment. Don’t repeat my mistakes. You might also like: 15 Beautiful Aesthetic Vision Board Skincare to Inspire Your Next Project
5. Master pH Testing for Every Homemade Skincare Recipe

If you’re mixing anything that contains water, aloe vera, or tea, you absolutely must test the pH. This is non-negotiable. As I mentioned, your skin’s acid mantle hovers around a 5.5 pH. If you whip up a homemade skincare recipe that has a pH of 8, you’re going to strip your skin of its natural oils and invite a massive breakout. I learned this the hard way after making a green tea toner that made my face feel tight and itchy. I didn’t test it. Now, I never skip this step. You can buy a pack of basic pH test strips at Walmart in the pool or pharmacy section for about $6.50. You just dip a tiny piece of the paper strip into your final mixture, wait three seconds, and match the color to the chart on the box. It’s incredibly satisfying to see the paper turn that perfect yellowish-orange color indicating a 5.5. If your product is too alkaline (green or blue on the strip), you can add a single drop of a mild citric acid solution to bring it down. If it’s too acidic (bright pink), a tiny pinch of baking soda dissolved in water can raise it. Just remember to test the pH before you add any thickeners or oils, as those can sometimes coat the paper and give you a false reading. You might also like: 20 Beautiful Aesthetic Night Skincare for Any Style
6. Preservatives Are Mandatory for Water-Based Mixes

This is the grossest lesson I’ve ever learned. Two years ago, I made a beautiful rosewater and glycerin hydrating mist. I kept it in a clear glass bottle on my bathroom vanity. After about two weeks, I sprayed it on my face and immediately smelled something sour and moldy. I unscrewed the cap and found a fuzzy black ring floating at the top of the liquid. It was horrifying. Any homemade product containing water, hydrosols, or aloe vera gel must include a broad-spectrum preservative. You can’t just use Vitamin E or rosemary extract. They’re antioxidants. They stop oils from going rancid, but they absolutely won’t kill bacteria, yeast, or mold. You need a cosmetic-grade preservative. I personally swear by Liquid Germall Plus. I buy a 2 oz bottle from a specialty soap-making supplier for around $12.50. You only need to add a tiny amount (usually 0.5% of your total formula weight) during the cool-down phase of your recipe. Yes, it’s a synthetic ingredient, but applying literal mold and invisible bacteria to your face is far more dangerous than a safe, tested preservative. Don’t skip this step unless you plan to throw the product away after three days in the fridge. I’ve never had a batch go bad since I started using Liquid Germall Plus. It gives me total peace of mind. You might also like: 15 Brilliant Skincare Routine Ideas That Make a Real Difference
Clear Stackable Makeup Organizer with Drawer
Clear Stackable Makeup Organizer with Drawer has been one of the most consistently praised picks in this category. 302 reviewers averaged 4.5/5.
7. The Acne-Fighting Tea Tree and Aloe Vera Mask

When I feel a massive, painful underground pimple forming on my chin, this is the exact mixture I pull together. You’re going to need 1 teaspoon of activated charcoal powder, 1 tablespoon of pure aloe vera gel, and exactly 2 drops of tea tree essential oil. I use Lily of the Desert 99% Aloe Vera Gelly, which costs $8.49 for a 4 oz tube. For the oil, I use ArtNaturals Tea Tree Oil, usually priced around $9.99 for a 0.5 oz bottle. I buy my activated charcoal capsules at Trader Joe’s for $6.99 and just break one open. Mix it all together in a small ceramic bowl. It forms this pitch-black, cooling gel that feels amazing on inflamed skin. The charcoal acts like a magnet to pull excess sebum out of your pores, while the aloe vera provides a soothing base. The tea tree oil is the real star here, as it contains potent antibacterial properties. Apply it only to your congested areas, not your whole face. Let it dry for 15 minutes. Rinse it off with warm water and a dark washcloth, because the charcoal will stain your white towels just like the turmeric does. I’ve noticed my breakouts shrink to half their size overnight when I use this as a spot treatment before bed.
8. Dilute Essential Oils Safely (The 1% Rule)

I see so many DIY videos where people are aggressively shaking ten or fifteen drops of lavender oil into a tiny one-ounce bottle of face serum. It makes me cringe. Essential oils are incredibly concentrated plant extracts. They’re potent chemicals. If you apply them undiluted, or poorly diluted, you will eventually develop a sensitization reaction. I did this with peppermint oil once. I added way too much to a lip balm, and my lips swelled up and burned for two straight days. It felt like I’d rubbed jalapeño juice on my mouth. For any facial leave-on products, your total concentration of essential oils should never exceed 1%. If you’re making a standard 30ml (1 oz) serum, you should use no more than 6 drops of essential oil total. I usually buy NOW Foods essential oils because they’re affordable and provide purity testing. A 1 oz bottle of their lavender oil is about $7.99. Always mix your essential oils into a carrier oil first. Never drop them directly into water, because oil and water don’t mix. The essential oil will just float on the top, and you’ll end up applying a concentrated, burning drop directly to your skin. Respect the potency of these oils, and your skin will thank you.
9. Gentle Exfoliation with a Soothing Oatmeal Mask

When my skin barrier is completely wrecked from testing too many harsh acids, this is my rescue remedy. It’s messy, it looks like breakfast, but it works instantly. You’ll need 2 tablespoons of finely ground colloidal oatmeal. I don’t bother grinding my own oats anymore. I just buy a box of Aveeno Soothing Bath Treatment at Target. It costs $7.97 for 8 packets, and it’s 100% pure colloidal oatmeal. Mix that with 1 tablespoon of plain Greek yogurt and 0.5 teaspoons of sticky, raw honey. The texture is thick, gooey, and a little bit lumpy. You apply it in gentle, circular motions. The oatmeal contains natural cleansers called saponins that lightly lift away dead skin cells without scratching your face. You have to leave it on for about 15 minutes. Rinsing it off is honestly the most annoying part. The honey makes it cling to your skin, so you’ve got to use a wet washcloth and a lot of patience. If you try to just splash it off with water, you’ll be standing at the sink for ten minutes. But once it’s off, your skin will feel incredibly soft, plump, and calm. All the redness just vanishes. I’ve stopped buying expensive exfoliating scrubs entirely because this cheap pantry mixture does a much better job without causing micro-tears in my skin.

COSRX Vitamin E Vitalizing Sunscreen
COSRX Vitamin E Vitalizing Sunscreen has been one of the most consistently praised picks in this category. 42 reviewers averaged 4.5/5.
10. Stop Putting Baking Soda on Your Face

This is another massive internet myth that needs to die. Baking soda is not a skincare ingredient. Back in my early twenties, I read a blog post that told me to mix baking soda with water to create a cheap exfoliating scrub. I bought a massive 13-pound bag of Arm & Hammer baking soda at Costco for $8.99 and went to town on my face. It felt gritty and satisfying at first. But within a week, my skin was producing twice as much oil, and I was breaking out in tiny, painful bumps. Baking soda is highly alkaline. It has a pH of around 9. When you scrub it onto your face, you’re aggressively stripping away your acid mantle and all your protective lipids. Your skin panics and overproduces oil to compensate. Plus, the jagged particles of the baking soda cause microscopic tears in your skin, leaving you vulnerable to bacteria. I ruined my skin barrier for a solid month because of that Costco bag. If you want a physical exfoliant, use something perfectly round and gentle, like jojoba beads. It has absolutely no business being anywhere near your delicate facial skin. I’m begging you to throw out any recipe that calls for baking soda as a facial scrub. It’s just not worth the damage.
11. Embrace Skin Slugging for Intense Overnight Hydration

If you haven’t tried slugging yet, you’re missing out on the easiest way to wake up with glass skin. This is going to be a massive trend in 2026, but dermatologists have been recommending it for decades. Slugging simply means applying a thin layer of an occlusive ointment as the very last step in your nighttime routine. It locks in all your serums and prevents transepidermal water loss while you sleep. I use plain Vaseline. I buy the large 13 oz tub at Walmart for exactly $4.89, and it lasts for an entire year. If you want something with a few more skin-repairing ingredients, CeraVe Healing Ointment is fantastic and costs around $11.97 for a 3 oz tube. You don’t need a thick layer. Just take a pea-sized amount, warm it up between your fingers, and press it gently over your face. You will look greasy. The biggest negative here is that it will absolutely transfer onto your pillowcase. I’ve got to change my pillowcases twice a week now. But when I wash my face in the morning, my skin is unbelievably soft and bouncy. It completely cured the dry, flaky patches around my nose that I get every winter. I’ve tried skipping this step on cold nights, and I always wake up regretting it.
12. Source Real Cosmetic-Grade Ingredients

This is where a lot of beginners mess up. When you decide to make your own lotions or serums, it’s really tempting to just run to the local craft store and buy their cheap blocks of shea butter or little vials of fragrance oils. Don’t do it. I bought a block of raw cocoa butter from a craft store once, and when I melted it down, there were literally tiny pieces of dirt and twig floating in it. It smelled like stale chocolate and chemicals. You’ve got to buy cosmetic-grade ingredients from reputable suppliers. A good supplier will always provide a Certificate of Analysis (COA) for their products. This document proves the ingredient has been tested for purity, heavy metals, and bacterial contamination. Yes, you might have to pay $15 for shipping from a specialized online vendor instead of driving down the street, but the quality difference is night and day. If you’re going to take the time to formulate a beautiful product, don’t ruin it by using inferior, dirty ingredients. Your face deserves better than craft-grade wax meant for making cheap candles. I’ve learned that investing in high-quality raw materials is the only way to get results that rival expensive store-bought skincare lines.

Masirs Clear Makeup Organizer
If you want something that just works, Masirs Clear Makeup Organizer – 16-Compartment Cosmetic and Jewelry Ho is a safe bet (258 reviews, 4.5 stars).
13. A Simple Honey and Green Tea Toner

I absolutely love the soothing properties of green tea. It’s packed with antioxidants that help calm down redness. To make this toner, you need to steep one organic green tea bag in 1/2 cup of hot distilled water. Let it cool completely. Then, stir in 1/2 teaspoon of raw honey. I buy the Kirkland Signature Raw Honey at Costco. It’s $14.99 for a massive 3-pound jar. Now, here is the crucial part that most blogs leave out. Because this is basically just water and food, it will grow bacteria within 48 hours if you leave it on your bathroom counter. You’ve got two options. You can either make a tiny fresh batch every two days and keep it strictly in the refrigerator, or you must add a broad-spectrum preservative like Liquid Germall Plus. I used to keep unpreserved green tea toner in my fridge, but honestly, applying freezing cold liquid to my face at 6 AM was a miserable sensory experience. Now, I just add the preservative so I can keep the amber glass spray bottle right on my vanity. It smells faintly earthy and leaves my skin feeling perfectly prepped for my moisturizer. I’ve completely ditched my expensive store-bought toners since perfecting this simple, calming formula.
14. The Proper Storage Rules for Your DIYs

You can formulate the most perfect serum in the world, but if you store it in a cheap plastic tub sitting in direct sunlight, it’s going to ruin your skin. Light, heat, and air are the enemies of homemade products. I used to keep all my oils in clear glass dropper bottles on a shelf right next to my bathroom window. Within three months, my expensive rosehip oil turned cloudy and smelled like old cooking grease. It had oxidized completely. You need to invest in dark amber or cobalt blue glass bottles. I buy a pack of four amber glass dropper bottles at Target for $5.99. Secondly, keep your products away from heat. Your bathroom gets incredibly hot and humid every time you shower. That fluctuating temperature speeds up bacterial growth and breaks down emulsions. I now keep all my backup oils and any unpreserved water-based masks in a dedicated corner of my kitchen fridge. The cool temperature extends their shelf life significantly. It’s a bit annoying to walk to the kitchen during my nighttime routine, but it’s better than rubbing rancid oil on my face. I’ve learned that treating my skincare ingredients like perishable food is the best way to keep them potent and safe.
I hope you’re feeling ready to tackle your routine without destroying your skin barrier. I’ve made every mistake in the book so you don’t have to. Remember, a good homemade skincare recipe isn’t about slapping kitchen condiments on your face. It’s about precision, safety, and understanding how ingredients actually work together. Drop a comment below if you try the rosehip serum or the oatmeal mask. I’d love to hear how your skin reacts. Make sure you pin this article to your skincare board so you can easily reference the measurements and preservative rules later!
Frequently Asked Questions
Do I really need a preservative for my homemade skincare recipe?
Yes. Any formula containing water, aloe vera, or tea must have a broad-spectrum preservative like Liquid Germall Plus. Without it, your product will quickly grow invisible bacteria and mold, which can cause severe skin infections.
Can I use kitchen measuring spoons for DIY skincare?
No. You must measure ingredients by weight in grams using a digital scale. Eyeballing volumes is highly inaccurate. A tablespoon of dense butter weighs much differently than a lightweight oil, which will ruin your formulation.
Is it safe to put lemon juice directly on my face?
Absolutely not. Lemon juice has a highly acidic pH of around 2, which will cause chemical burns and destroy your skin barrier. It also causes phytophotodermatitis, leading to severe blistering if exposed to sunlight.
How many drops of essential oil should I use for my face?
For facial leave-on products, your essential oil concentration shouldn’t exceed 1%. In a standard 30ml or 1 oz serum bottle, you should use no more than 6 drops total to prevent irritation and allergic reactions.