What’s Inside
- Start With A Double Cleanse In The Evening
- Apply Toners To Damp Skin For Maximum Absorption
- Incorporate A Chemical Exfoliant Carefully
- Layer Serums From Thinnest To Thickest
- Pat Hyaluronic Acid Onto Damp Skin
- Prioritize Vitamin C For Morning Protection
- Embrace Peptide Serums For Collagen Banking
- Tap Eye Cream Gently With Your Ring Finger
- Target Blemishes With Spot Treatments
- Lock Everything In With Moisturizer On Damp Skin
- Never Skip Sunscreen As Your Final Morning Step
- Introduce Retinol Gradually At Night
- Try Slugging For A Massive Hydration Boost
I was standing in the checkout line at Whole Foods last Tuesday when I caught my reflection in the security mirror and audibly gasped. My entire face was peeling off in gross, white, eraser-like shavings because I’d completely botched my morning routine. Nailing your skincare order of application is the difference between a glowing complexion and looking like a shedding reptile. For years, I just slapped serums and creams on my face in whatever order I grabbed them from my bathroom cabinet. I wasted hundreds of dollars on luxury products that just sat on top of my skin like an oil slick. I tried this wrong for months before figuring it out. It’s not just about what you buy. It’s about how and when you apply it. Let’s fix your routine so you don’t end up covered in pilling sunscreen like I did.
1. Start With A Double Cleanse In The Evening

I didn’t believe in double cleansing until I wiped my face with a white towel after a single wash and saw a beige streak of leftover foundation. Gross. Your evening skincare order of application has to start with a completely clean slate. I’m obsessed with the DHC Deep Cleansing Oil ($29 for 6.7 fl oz). I pump exactly 1/2 teaspoon into my dry hands and massage it over my dry face for a full sixty seconds. It smells faintly of olive oil and melts away stubborn waterproof mascara without stinging my eyes. After rinsing that off with lukewarm water, I go in with my water-based cleanser. I usually grab the CeraVe Hydrating Facial Cleanser ($15 for 16 fl oz) during my monthly Costco hauls. I use a dime-sized dollop. It has this milky, lotion-like texture that doesn’t foam up. I thought it wasn’t working, but skipping the harsh bubbles actually saves your skin barrier. Dr. Shereene Idriss talks about this specific step constantly. If you don’t remove the oil and grime first, your expensive serums won’t penetrate. They just sit on top of the dirt. Don’t make the mistake of using makeup wipes either. They just smear the dirt around. I’ve ruined so many pillowcases relying on wipes. It’s just not enough. Learned that the hard way.
2. Apply Toners To Damp Skin For Maximum Absorption

Most people get this wrong. I definitely did. I used to dry my face completely with a thick towel until it felt tight and itchy, and then I’d swipe toner on with a cotton pad. I was wasting so much product. Your skin is exactly like a dry kitchen sponge. If you put a drop of water on a stiff, dry sponge, it just sits there on the surface. If the sponge is slightly damp, it absorbs everything instantly. After cleansing, I leave my face dripping wet for a second. Then I take about 1/4 teaspoon of Thayers Witch Hazel with Aloe Vera Toner ($10 for 12 fl oz) that I always pick up at Target. I pour it directly into my palms. Skip the cotton rounds entirely. They just steal your expensive product. I rub my hands together and gently press the liquid into my slightly damp skin. It smells like fresh cucumbers and feels instantly cooling on my cheeks. This prep step is non-negotiable in my routine now. Applying toner to damp skin enhances the absorption of the product and gets your face completely ready for the heavy hitters. If your skin feels squeaky before you apply toner, you’re waiting way too long after washing. Move faster.
3. Incorporate A Chemical Exfoliant Carefully

Let’s talk about shedding dead skin. I used to scrub my face with those aggressive apricot scrubs until I was red and raw. Total disaster. Now, I strictly use chemical exfoliants, specifically the Paula’s Choice 2% BHA Liquid Exfoliant ($34 for 4 fl oz). But here is the major catch. You can’t use this every single day. I tried doing that last winter and completely destroyed my skin barrier. My face felt like sandpaper and burned when I sweat at the gym. Now, I only use it two to three times a week. In your skincare order of application, this goes right after your toner while your skin is still slightly damp. I dispense exactly 5 drops into my palm and pat it over my T-zone, avoiding my delicate eye area. It has a slightly oily slip to it and smells a bit clinical, almost like vinegar, but it works miracles on stubborn blackheads. Dermatologists practically beg people to stop over-exfoliating. If you use it too much, you’re going to get severe irritation and peeling. Trust me on this. Less is more. Let it sink in for a full two minutes before moving on to the next step. You want the salicylic acid to actually do its job inside your pores.
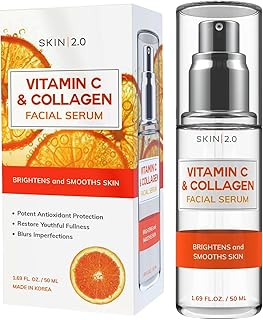
Skin 2.0 Vitamin C Serum – Dermatologist Tested
A dependable everyday pick — Skin 2.0 Vitamin C Serum – Dermatologist Tested pulls in 45 ratings at 4.5 stars. Not flashy, just solid.
4. Layer Serums From Thinnest To Thickest

If you take away nothing else, remember this rule. Always layer your serums from the thinnest consistency to the thickest. I used to slap on a heavy cream and then try to rub a watery serum over it. It slid right off my face onto my shirt. You’ve got to give the lightweight, water-based ingredients a chance to penetrate deeply without being blocked by heavier oils or silicones. For example, my holy grail morning product is the SkinCeuticals CE Ferulic ($169 for 1 fl oz). Yes, the price makes me want to cry, but it works. I use exactly 4 drops from the glass dropper. It has the consistency of water and smells strongly of hot dog water. I’m not kidding. It smells terrible. But because it’s so thin, it goes on first. I press it into my skin and wait about sixty seconds. If I’m using a thicker hyaluronic acid serum next, the Vitamin C won’t get blocked. Pro tip: if your serums start pilling or rolling up into little white balls when you rub them, you’re either applying them in the wrong order or you aren’t waiting long enough between layers. Slow down your routine. I’ve wasted so much expensive product by rushing. You might also like: 15 Inspiring Aesthetic Skincare Products to Transform Your Space
5. Pat Hyaluronic Acid Onto Damp Skin

Hyaluronic acid is a tricky little ingredient. It’s a humectant, which means it draws moisture from the environment into your skin. I used to apply it to a bone-dry face, and I couldn’t figure out why my skin felt tighter and drier than before. It turns out, if there is no moisture in the air or on your face, the acid will actually pull water out of your deep skin layers. I learned this the hard way after a very dry flight to Vegas. Now, I keep a little spray bottle of water on my counter. I mist my face until it’s visibly wet. Then I take a pea-sized amount of The Ordinary Hyaluronic Acid 2% + B5 ($8 for 1 fl oz). I usually grab a few bottles when I’m browsing the aisles at Sprouts. It has a gooey, slightly sticky texture. I pat it firmly into my wet skin. The stickiness disappears entirely as it dries, leaving my face looking ridiculously plump and bouncy. You’ve got to trap that moisture immediately with your next steps. Don’t just let it air dry completely or you defeat the whole purpose. I’ve noticed a massive difference in my fine lines since fixing this. You might also like: 20 Charming Aesthetic Videos Night Routine Skincare You’ll Want to Bookmark
6. Prioritize Vitamin C For Morning Protection

Your morning routine is all about defense. You’re going out into the world to face pollution, sun damage, and stress. That’s why Vitamin C is non-negotiable. I integrate it right after my toner. I personally swear by the Timeless Skin Care 20% Vitamin C + E Ferulic Acid Serum ($25 for 1 fl oz). It comes in this bright yellow pump bottle that keeps the light out so the serum doesn’t oxidize and turn brown. I pump exactly a pea-sized amount onto my fingertips. It’s very watery and has a sharp, metallic citrus scent. I press it into my cheeks, forehead, and chin. It tingles slightly for about ten seconds. This stuff provides crucial antioxidant protection against environmental aggressors and fades my old acne scars. A common mistake I see people make is mixing Vitamin C with retinol or strong exfoliating acids in the same routine. Don’t do that. You will burn your face off. Keep your Vitamin C in the morning and your strong acids or retinols at night. It keeps your skin barrier happy and ensures the ingredients aren’t canceling each other out. I’ve finally achieved an even skin tone by sticking to this strict rule. You might also like: 15 Lovely Tips Korean Skincare That Changed Everything

EQQUALBERRY Vitamin Illuminating Serum | Niacinamide 4% +
EQQUALBERRY Vitamin Illuminating Serum | Niacinamide 4% + Brightening has been one of the most consistently praised picks in this category. 108 reviewers averaged 4.5/5.
7. Embrace Peptide Serums For Collagen Banking

Peptides are everywhere right now, and they are going to be the massive 2026 trend for skin longevity. Think of peptides as little messengers that tell your skin cells to build more collagen. I started focusing on collagen banking last year when I noticed my cheeks looking a little flat. I use The Inkey List Peptide Serum ($15 for 1 fl oz). It comes in a simple black and white plastic bottle. I squeeze out a pea-sized amount. It has a cloudy, gel-like consistency that feels incredibly soothing and has zero scent. I apply this morning or night, usually right after my thinner serums. It plays nicely with almost every other ingredient, which makes it super easy to slot into your routine. I pat it gently around my mouth and forehead where I’m starting to see fine lines. Honestly this changed how I view anti-aging. You don’t need harsh peeling acids to get firm skin. Consistent use of peptides gently plumps everything up over time. Just remember to let it sink in for a minute before you slap your moisturizer over it, otherwise you’re just diluting the active ingredients. I’ve seen such a huge improvement in my skin’s bounce.
8. Tap Eye Cream Gently With Your Ring Finger

The skin around your eyes is as thin as tissue paper. I used to violently rub my eye cream in with my index fingers like I was trying to scrub a stain out of a carpet. No wonder I had dark circles and puffiness. You’ve got to be incredibly gentle. I dispense exactly a grain-of-rice-sized amount of Kiehl’s Creamy Eye Treatment with Avocado ($36 for 0.5 fl oz) for each eye. I was actually standing in the checkout line at Kroger grabbing groceries when I realized my under-eyes looked so dry in my phone camera, I immediately ordered a restock on my phone. No exaggeration. This cream is thick, bright green, and feels like mashed avocado. It’s so rich. I take that tiny amount on my ring finger. Your ring finger has the weakest muscles, so it applies the least amount of pressure. I gently tap it along my orbital bone, starting from the outer corner and moving inward. Never pull or drag the skin. Apply your eye cream before your heavy face moisturizer. If you put moisturizer on first, the heavy oils will block the delicate eye cream from actually absorbing. I’ve stopped waking up with puffy eyes since I switched to this tapping method.
9. Target Blemishes With Spot Treatments

We all get those angry, painful underground pimples. When I feel one coming on, my instinct is to drown my entire face in acne medication. Don’t do this. You’ll just dry out your healthy skin and create a flaky mess. Spot treatments need to go directly on the blemish after your serums have absorbed, but right before your moisturizer. My absolute favorite is the Mario Badescu Drying Lotion ($17 for 1 fl oz). It comes in a small glass bottle with a pink sediment at the bottom and clear liquid on top. Here is a massive warning. Do not shake the bottle. I shook it the first time I bought it and ruined the formula. You’re supposed to dip a cotton swab straight down through the clear liquid into the pink clay at the bottom. I pull out the swab and dab exactly one drop directly onto the pimple. It smells intensely of rubbing alcohol and calamine. It dries into a crusty pink dot within seconds. Let it dry completely before you carefully pat your moisturizer around it. If you rub moisturizer over it, you’ll smear the pink clay all over your cheeks. I’ve learned to just carefully dab my lotion around the pink dots.

COSRX Vitamin E Vitalizing Sunscreen,SPF 50 Face Sunscreen
COSRX Vitamin E Vitalizing Sunscreen has been one of the most consistently praised picks in this category. 42 reviewers averaged 4.5/5.
10. Lock Everything In With Moisturizer On Damp Skin

Moisturizer is the lid that keeps all your expensive serums from evaporating into the air. If you skip this step, you’re throwing your money away. I alternate between two favorites depending on the season. In the humid summer, I use the Neutrogena Hydro Boost Hydrating Water Gel ($20 for 1.7 oz). It’s this beautiful translucent blue gel that smells like a fresh swimming pool. In the dry winter, I switch to the heavy-duty CeraVe Moisturizing Cream ($18 for 19 oz) that comes in a massive tub I always grab at Walmart. Regardless of which one I use, I always apply a nickel-sized amount to slightly damp skin. If my face has dried down completely from my serums, I’ll lightly mist it with water again. The moisturizer traps that surface water and pushes it down into the skin. I massage it in upward circles, starting from my neck and working up to my forehead. One of the biggest mistakes I see is people using way too much cream. A nickel-sized amount is plenty. If your face feels greasy thirty minutes later, you applied too much and you’re going to clog your pores. I’ve finally figured out the exact amount my skin needs.
11. Never Skip Sunscreen As Your Final Morning Step

If you only listen to one piece of advice from me, let it be this. Sunscreen is the absolute final step in your morning routine. It’s non-negotiable. I don’t care if you work from home in a dark room. UV rays bounce off windows and screens. I used to mix a few drops of sunscreen into my moisturizer to save time. My dermatologist practically yelled at me. Mixing sunscreen dilutes the SPF protection and leaves you vulnerable to sun damage. You’ve got to apply it as a separate, final layer. I use exactly 1/2 teaspoon of the La Roche-Posay Anthelios Melt-in Milk Sunscreen SPF 60 ($25 for 5 fl oz). I measure it out by drawing two lines of lotion down my index and middle fingers. It’s a thick, white cream that smells faintly of standard beach sunscreen, but it melts into the skin without leaving a chalky white cast. I rub it generously over my face, neck, and the tops of my ears. Give it a full five minutes to dry down and form a protective film before you even think about applying foundation. Otherwise, your makeup will slide right off. I’ve ruined so many makeup looks by rushing this step.
12. Introduce Retinol Gradually At Night

Retinol is the gold standard for anti-aging, but it’s also the easiest ingredient to mess up. I bought a strong prescription retinol a few years ago, used it three nights in a row, and my face practically fell off. I had chemical burns around my nose and mouth for a week. You’ve got to introduce retinol gradually. I recommend starting with something gentle over the counter, like the RoC Retinol Correxion Deep Wrinkle Night Cream ($20 for 1 oz). It comes in a gold aluminum tube. I squeeze out exactly a pomegranate-seed-sized amount. That’s it. Do not use more than that. It has a lightweight, silky texture and a slightly floral scent. In your nighttime skincare order of application, this goes on completely dry skin after cleansing, before moisturizing. I apply it just one to two times a week to my entire face. If you’ve got sensitive skin, try the sandwich method. Apply a thin layer of moisturizer, then the retinol, then another layer of moisturizer. It buffers the strength of the retinol so you get the benefits without the horrific peeling and redness. I’ve finally built up my tolerance, but it took months of patience. Took me years to figure out.

medicube No Cast Just Glow Collagen Sunscreen | SPF 50
Honestly, medicube No Cast Just Glow Collagen Sunscreen | SPF 50 Broad Spectrum surprised me — sturdier than it looks in the photos, and over 861 buyers gave it 4.5 stars.
13. Try Slugging For A Massive Hydration Boost

This is the 2026 trend that sounds disgusting but actually works. Slugging involves coating your face in a thin layer of an occlusive ointment as the very last step of your nighttime routine. I was complaining to the cashier at Trader Joe’s last month about my horribly dry, flaky winter skin, and she told me she swears by slugging. I was skeptical. I bought a tub of Vaseline Healing Jelly Original ($4 for 1.75 oz). You literally just take a pea-sized scoop of the clear, gooey petroleum jelly, warm it up between your fingers, and press a thin layer over your entire face after your moisturizer. It creates an impenetrable barrier that prevents transepidermal water loss. You will look like a glazed donut, and your pillowcase might get a little messy, but you will wake up with the softest, most hydrated skin of your life. A quick warning though. Do not slug over active ingredients like retinol or chemical exfoliants. The Vaseline traps them and makes them way too strong, which causes irritation. Also, as the experts at Neoderma point out, avoid the common mistake of overusing products. You only need a paper-thin layer. If you’ve got active breakouts, skip this entirely. I’ve saved my winter skin by doing this twice a week.
Figuring out your routine doesn’t have to be a nightmare. I’ve made all the mistakes so you don’t have to. Once you memorize the basic rule of thinnest to thickest, everything else just falls into place. Your skin is going to look so much better when your products can actually do their jobs. I highly recommend taking a sharpie and numbering your bottles so you don’t forget when you’re tired at night. Pin this guide or save it to your phone so you can reference it during your next shopping trip. You’ve got this.
Frequently Asked Questions
Does your skincare order of application really matter?
Yes, it’s absolutely crucial. If you apply thick creams before thin serums, the heavy oils block the lightweight ingredients from absorbing. Applying products in the wrong order wastes your money and can cause severe pilling or breakouts.
Where does sunscreen go in my skincare order of application?
Sunscreen is always the absolute final step in your morning routine. You must apply it after your moisturizer has fully dried. Never mix it with other products, as this dilutes the SPF and ruins your protection.
Should I apply retinol before or after moisturizer?
In your nighttime skincare order of application, retinol traditionally goes on dry skin before moisturizer. However, if you’ve got sensitive skin, you can use the sandwich method: apply moisturizer, then retinol, then another layer of moisturizer to prevent irritation.
How long should I wait between skincare steps?
I’d recommend waiting about thirty to sixty seconds between most serums to let them absorb. For chemical exfoliants or sunscreen, give it a full two to five minutes to dry down completely before moving to the next layer.
