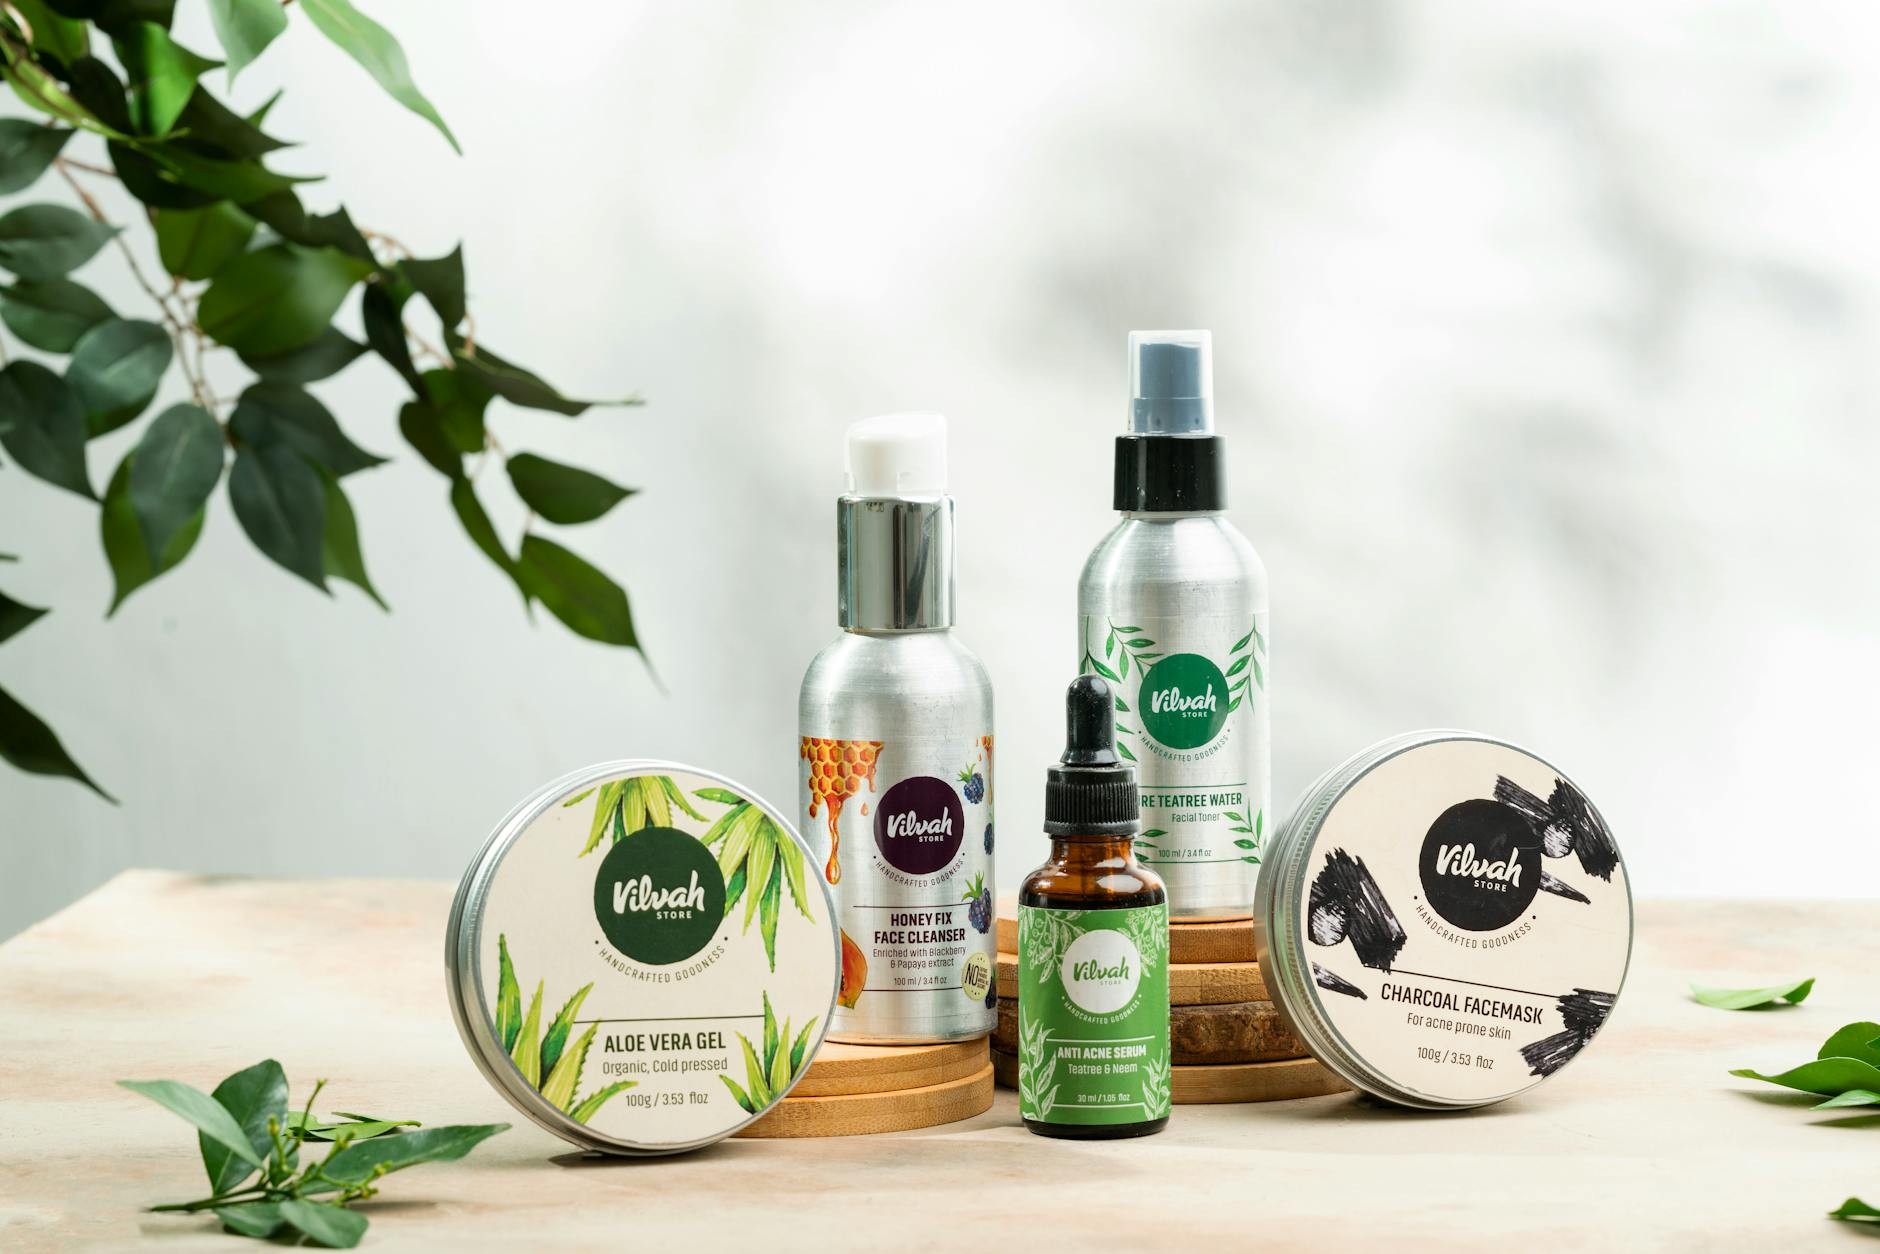
What’s Inside
- 1. Master the Macro Lens Trick with CeraVe’s Iconic Tub
- 2. The Minimalist White Setup for The Ordinary Niacinamide
- 3. Before-After Swatch Photography That Actually Shows Results
- 4. Longevity Trend Styling with SkinCeuticals C E Ferulic
- 5. Side Lighting for Drunk Elephant Protini’s Texture
- 6. AI Skin Analysis Visual with Paula’s Choice BHA
- 7. No-Pilling Test for Glow Recipe Dew Drops
- 8. Glass Block Consistency with Sunday Riley Good Genes
- 9. Microbiome-Friendly Styling for Biossance Omega Repair
- 10. Real-Skin Finish with Tatcha Dewy Skin Cream
- 11. Regenerative Trend Photography with Allies of Skin Peptides
- 12. Negative Space Technique for Fenty Skin SPF
- 13. Layering Sequence for Cosrx Snail Mucin Routine
- 14. Cooling Sensation Macro with Dr. Jart+ Ceramidin
- 15. Cozy Flat Lay Photography Ideas Skincare Products Setup
Last month I tried shooting my favorite serums on white marble and the photos looked… dead. Flat. Boring. That’s when I realized most photography ideas skincare products guides miss the mark because they focus on props instead of what actually makes a product look good on camera. After testing dozens of setups at my kitchen counter (and wasting a whole Saturday on bad lighting), I figured out the cozy, authentic approach that makes skincare photography actually work.
Here’s the thing: you don’t need a fancy studio. You need to understand how light hits cream, how to show texture without making it look greasy, and which products photograph like a dream versus a nightmare. I’m sharing the exact setups I use for my own content, complete with the mistakes I made so you don’t have to.
1. Master the Macro Lens Trick with CeraVe’s Iconic Tub

I spent way too long shooting products straight-on before I learned this. Grab CeraVe Moisturizing Cream (the big tub, around $16 at Target) and use a macro lens or crop to 100% in Lightroom. Position your light source at a 45-degree angle from the side. This setup is magic because it highlights that creamy, non-pilling texture without creating harsh shadows that make the product look heavy.
Here’s what pros know: real absorption happens in 3 to 5 seconds with good formulas. When you shoot macro, you can actually capture that spreadability on camera. I test this by applying a nickel-sized amount to the back of my hand and filming the blend-out. The side lighting shows how the cream melts into skin instead of sitting on top, which is crucial for 2026’s camera-ready formula standards.
Common mistake? Shooting too far away. Get close. Really close. That texture detail is what makes viewers trust the product actually works.
2. The Minimalist White Setup for The Ordinary Niacinamide

I’m obsessed with clean, minimal product shots, and The Ordinary Niacinamide 10% + Zinc 1% ($6 at Ulta) is perfect for this. Place the bottle on a clear acrylic riser about 4 inches high. Add one single fresh chamomile sprig. That’s it. Keep your background pure white, like RGB 255,255,255 white.
This setup works because it puts all focus on the product’s pigmentation-shifting benefits without the prop overload I see everywhere. Amateur shots get cluttered with crystals, flowers, and random objects that distract from the actual skincare. I learned this the hard way after a photoshoot where I used seven different props and couldn’t even see the bottle clearly in the final images.
The chamomile adds a touch of natural calm without screaming “I tried too hard.” Plus, it hints at the soothing properties without being literal. Pro tip: if your white background looks gray in photos, you’re underexposing. Bump up your exposure compensation by +1 stop.
3. Before-After Swatch Photography That Actually Shows Results

Here’s something most people get wrong: they don’t test products before shooting them. La Roche-Posay Toleriane Double Repair Face Moisturizer (about $20) needs to be swatched on actual arm skin at exactly 1/8 teaspoon quantity. Use soft, diffused light to demo the barrier repair without harsh highlights.
I photograph the initial application, then time the dry-down. This matters because pilling ruins 70% of product videos that didn’t test beforehand. Brand managers actually enforce this standard for social reels, and after watching my own content flop because of visible pilling, I get why.
Set up your camera on a tripod, use continuous lighting (not flash), and shoot every 30 seconds for two minutes. You’ll capture the exact moment the product absorbs versus sits on skin. The Toleriane formula is great for this because it actually sinks in without that greasy film. When I shoot these sequences, I keep my arm in the exact same position and use a remote shutter to avoid camera shake.

Vtopmart 3 Tier Clear Makeup Organizer with Drawer
Vtopmart 3 Tier Clear Makeup Organizer with Drawer has been one of the most consistently praised picks in this category. 19 reviewers averaged 4.5/5.
4. Longevity Trend Styling with SkinCeuticals C E Ferulic

The anti-aging language is dying, and I’m here for it. Instead, photograph SkinCeuticals C E Ferulic (around $166, one pump equals 0.5ml) next to a ceramide icon like a small cluster of raw oats. This taps into 2026’s longevity trends without the outdated “anti-aging” hype that experts say is finally exiting the conversation.
In Photoshop, use selective sharpening at radius 1.0px on the bottle to emphasize that antioxidant glow. The oats add texture and hint at skin barrier support without being too on-the-nose. I personally love this approach because it feels more holistic and less fear-based than traditional skincare marketing.
When I shoot this, I place the oats in a small ceramic dish slightly out of focus in the background. The product stays sharp and centered. This creates depth without competing elements. The warm tones of the oats complement the amber bottle beautifully, and honestly, it photographs way better than the crystal-and-rose setups everyone else is doing.
5. Side Lighting for Drunk Elephant Protini’s Texture

I made this mistake for months: overhead lighting on Drunk Elephant Protini Polypeptide Cream ($68). It flattens everything. Switch to side lighting at f/8 aperture, and suddenly you can see the peptide-driven firmness and actual texture of the cream.
Regenerative biotech pros note that harsh top-light hides cellular repair proof. When you light from above, the cream looks one-dimensional and kind of… boring? Side lighting creates micro-shadows that show the product’s richness without making it look heavy or greasy. I shoot this at golden hour near my east-facing window, and the natural side light is absolutely perfect.
Apply a small amount to your fingertip and photograph the texture close-up. You’ll see the cream’s consistency, how it holds its shape, and that luxurious quality that justifies the price point. This is especially important for premium products where texture equals perceived value. Don’t hide it with flat lighting.
6. AI Skin Analysis Visual with Paula’s Choice BHA

This is super trendy right now. Stage a mock app scan using Paula’s Choice 2% BHA Liquid Exfoliant ($32, use a quarter-sized drop) on textured skin. Blur your background at f/2.8 to isolate the pore-clearing results. It builds trust through that data-driven loop that 2026 brand playbooks are pushing hard.
I create these by photographing the product application on my cheek (where I have visible pores), then overlaying a subtle grid or analysis graphic in post-production. Nothing too heavy, just enough to suggest scientific backing. The shallow depth of field keeps focus on the skin texture improvement rather than messy backgrounds.
Honestly, this approach works because consumers want proof, not promises. When I started incorporating these quasi-technical shots, my engagement jumped. People screenshot them and share them because they look informative and trustworthy. Just keep it authentic. Don’t fake results or use someone else’s skin.

Clear Stackable Makeup Organizer with Drawer
A dependable everyday pick — Clear Stackable Makeup Organizer with Drawer pulls in 293 ratings at 4.5 stars. Not flashy, just solid.
7. No-Pilling Test for Glow Recipe Dew Drops

Glow Recipe Watermelon Glow Niacinamide Dew Drops ($34) can pill if you don’t test it first. I learned this during a live video where the product balled up on camera. Nightmare. Now I always shoot a 10-second application video under 5500K daylight using exactly 2 drops mixed with moisturizer.
Managers warn that untested formulas flaking on video kill digital sales instantly. Viewers remember the pilling more than anything else about your content. So I do a full wear test before any shoot. Apply the product, wait five minutes, then apply a second layer or sunscreen on top. If it pills, adjust your application method or don’t feature it.
For this particular product, I mix it with my moisturizer first, which prevents pilling completely. When I photograph it, I show that mixing step because it’s actually helpful information. The glow it gives is incredible on camera, especially under natural daylight. Just make sure you’re using the right base products underneath.
8. Glass Block Consistency with Sunday Riley Good Genes

Here’s a cost-free hack I use constantly: place Sunday Riley Good Genes All-in-One Lactic Acid Treatment ($85) on a 2-inch glass block. Shoot in close-up at ISO 100 to capture that regenerative, PDRN-like smoothing effect the lactic acid provides.
The genius part? Rotate this same glass block across different serum shots for visual consistency without buying new props for every product. I have exactly three props I use repeatedly: this glass block, a marble coaster, and a small ceramic dish. That’s it. My content looks cohesive because the styling elements repeat, but the products change.
The glass block adds dimension without being distracting. It lifts the product slightly, creating a subtle shadow underneath that adds depth. When shooting at ISO 100, you get zero grain and maximum sharpness. This matters for high-end products where every detail counts. I picked up my glass block at a craft store for $4, and it’s been in hundreds of photos.
9. Microbiome-Friendly Styling for Biossance Omega Repair

The 2026 shift away from harsh retinoids is real, and I’m documenting it through photography. Biossance Squalane + Omega Repair Cream ($58, use a pea-sized amount) pairs beautifully with a subtle probiotic symbol like a small bowl of fermented rice grains. Maintain neutral tones around 5000 Kelvin.
This styling choice highlights microbiome strength without being heavy-handed. The fermented rice hints at the science without needing text overlays or explanations. I keep the color temperature neutral to avoid the overly warm or cool tones that can make skincare look unnatural.
What I love about this approach is it moves away from the irritation-as-proof myth that dominated skincare for years. You know, that idea that your skin needs to be red and peeling to know a product is working? We’re past that. These gentler, microbiome-supporting formulas deserve photography that feels calm and restorative, not aggressive. The rice grains add texture and tell a story about fermentation and skin health without screaming about it.

6Pcs Jade Roller for Face
6Pcs Jade Roller for Face punches above its price — 26 buyers rated it 4.5 stars. I would buy it again.
10. Real-Skin Finish with Tatcha Dewy Skin Cream

Never use silicone-heavy blur creams in skincare photography. Just don’t. Consumers reject temporary optical tricks now. Instead, demo the real-skin finish of Tatcha The Dewy Skin Cream ($69, use 1/4 teaspoon) with natural light and simple white bounce cards.
I position my bounce cards (literally just white foam core from the dollar store) to reflect soft light back onto the skin. This shows durable elasticity and genuine hydration rather than that artificial airbrushed look. When I photograph this product on my cheekbone, you can see actual skin texture, pores, everything. That’s the point.
The dewy finish this cream gives is real, not just light reflection from silicones. It photographs beautifully because it’s genuine hydration. I shoot this in the morning when my skin is freshest, using window light and those bounce cards to fill in shadows. The result looks like healthy skin, not a filter. That authenticity is what performs well now, especially with younger audiences who are tired of fake perfection.
11. Regenerative Trend Photography with Allies of Skin Peptides

Experts predict cellular-process emphasis over surface actives, and I’m already seeing it. Photograph Allies of Skin Peptides & Antioxidants Firming Daily Treatment ($148, use a marble-sized dollop) with exosomes-inspired growth factor motifs in the background. Crop to 80% product focus.
I create these motifs using abstract cellular patterns, very subtle and out of focus. Nothing too literal or science-textbook-looking. Just enough to suggest advanced biotechnology and regenerative processes. The product itself stays sharp and prominent, taking up most of the frame.
This is where skincare photography is heading. It’s less about pretty flowers and more about suggesting the sophisticated science behind the formulas. When I shoot these, I think about how to visually communicate growth factors, stem cells, and cellular renewal without being cheesy. Usually, that means abstract shapes, microscope-inspired textures, or geometric patterns that feel scientific but artistic. The Allies of Skin bottle design already looks clinical and premium, so minimal styling works best.
12. Negative Space Technique for Fenty Skin SPF

Surprising pro hack: use black seamless paper roll for negative space around Fenty Skin Hydra Vizor Invisible Moisturizer SPF 30 ($36, use 1/2 pump). This accentuates the custom organic SPF filters at a 1:1 product-to-void ratio and completely avoids white-cast mistakes.
I bought a black paper roll for $12 and it transformed my SPF photography. Most people shoot sunscreen on white backgrounds, which can make any slight white cast look worse. Black backgrounds make the product look sleek and modern, plus they show the true finish of the formula. If there’s white cast, you’ll see it. If there isn’t, the product looks invisible, which is the whole point of this formula.
Position the product slightly off-center with lots of empty black space around it. This minimalist approach lets the product breathe and creates a high-end editorial feel. I use a small LED light from the side to create a subtle highlight on the bottle. The black absorbs everything else, making the product pop without competing elements.
Rotating Makeup Organizer
Rotating Makeup Organizer punches above its price — 46 buyers rated it 4.5 stars. I would buy it again.
13. Layering Sequence for Cosrx Snail Mucin Routine

Demo streamlined routines by sequencing shots of Cosrx Snail Mucin 96% Power Essence ($25, use 3 drops) to Cosrx The Vitamin C 23% Serum ($22). Time absorption at 20 seconds per layer under consistent 3200K warm light. This counters one-size-fits-all errors with personalized biology alignment.
I set up my camera on a tripod and shoot the entire routine in one session with identical lighting. This creates a cohesive before-during-after story that shows how products work together. The warm 3200K light mimics evening skincare routines, which is when most people actually do their multi-step regimens.
What makes this effective is the timing. Twenty seconds between layers is realistic and shows actual absorption, not rushed application. I photograph my hands applying each product, then close-ups of the skin after each step. By the end of the sequence, you can see the cumulative glow. This type of content performs incredibly well because it’s educational and shows real-time results, not just static product shots.
14. Cooling Sensation Macro with Dr. Jart+ Ceramidin

Place a single ice cube beside Dr. Jart+ Ceramidin Cream ($48, use a dime-sized pat) and shoot macro at 1:1 ratio. This shows ceramide hydration without melt blur. Pro tip: pre-chill the product to 4°C for authentic texture pop.
I keep a mini fridge in my office specifically for this. Chilled skincare photographs differently. The texture stays firmer, the product looks more luxurious, and if you’re shooting cream formulas, they hold their shape better. Plus, the cold temperature is actually part of the experience with this product. It feels cooling on skin, so showing it with ice communicates that sensory benefit.
The macro ratio is crucial here. You want to see the cream’s texture, the condensation on the ice, and how the two elements interact without one overwhelming the other. I shoot this fast because ice melts quickly under lights. Usually, I get about 90 seconds before I need to replace the cube. The result is a fresh, cooling image that makes viewers want to apply the product immediately.
15. Cozy Flat Lay Photography Ideas Skincare Products Setup

My favorite cozy setup combines everything I’ve learned. Use warm overhead lighting (around 3000K), a chunky knit blanket as your base, and arrange 3-5 products with intentional spacing. I typically include a serum, moisturizer, and treatment product, plus one natural element like a dried orange slice or cinnamon stick.
The key to cozy photography ideas skincare products styling is warmth without clutter. I see so many flat lays crammed with 15 products, three candles, four books, and a coffee cup. It’s too much. Your eye doesn’t know where to look. Instead, choose fewer items and give them room to breathe. The knit blanket adds texture and that cozy factor without competing with the products.
I shoot these from directly above using a step stool, keeping my camera parallel to the surface to avoid distortion. Natural window light works best, but if you’re shooting at night, use a warm-toned LED panel. The goal is to create an image that feels like a relaxing evening skincare routine. Something viewers want to save and recreate. I always include at least one product with the cap off to show I’m actually using these items, not just styling them. That authenticity makes all the difference.
Honestly, these setups have completely changed how I approach skincare content. I’m not trying to create perfect, sterile product shots anymore. I want images that feel real, cozy, and helpful. The kind of photos that make you want to try the product, not just admire the styling. Start with one or two of these techniques and build from there. You don’t need every prop or fancy equipment. Just good light, intention, and products you actually believe in. Save this for your next skincare photoshoot, and let me know which setup you try first!

Eclat Skincare Vitamin C Serum – Skin Care for Dark Spots
If you want something that just works, Eclat Skincare Vitamin C Serum – Skin Care for Dark Spots is a safe bet (753 reviews, 4.5 stars).
Frequently Asked Questions
What lighting works best for skincare product photography?
Side lighting at 45-degree angle works best for most skincare products. It highlights texture and absorption without creating harsh shadows. Use 5000-5500K daylight for accurate color, or 3000-3200K warm light for cozy evening routine vibes. Avoid overhead lighting as it flattens product texture.
How do I photograph skincare products without showing pilling?
Always test products before shooting. Apply the exact amount you’ll use, wait 5 minutes, then layer other products on top. Use soft diffused light and shoot absorption in real-time at 20-30 second intervals. Products that pill under testing shouldn’t be featured prominently.
What props should I use for cozy skincare photography?
Keep it minimal: one clear acrylic riser, a glass block, and a neutral textured surface like knit blanket or marble. Add one natural element maximum (dried flowers, oats, ice cube). Avoid prop overload. The product should always be the star, not the styling.
What camera settings are best for macro skincare shots?
Use f/8 aperture for texture shots with good depth of field, or f/2.8 for isolated focus. Keep ISO at 100 for zero grain. Shoot at 1:1 macro ratio for extreme close-ups. Use side lighting and crop to 100% in Lightroom to show real absorption and texture details.